Showing posts with label UK. Show all posts

Wednesday 8 May 2024

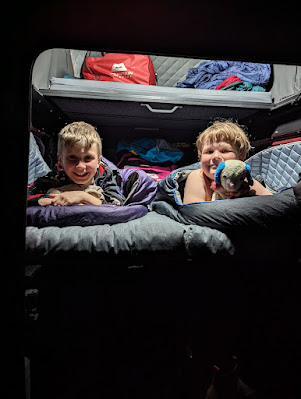
Can you sleep a family of four in a Defender?

The short answer is yes, but read on if you want to know how!

4-berth Defender Camper Interior Layout

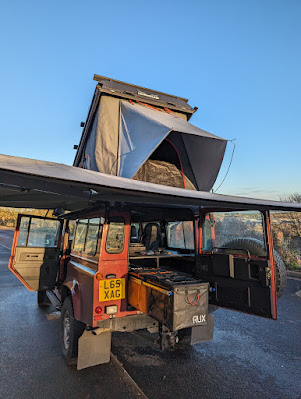
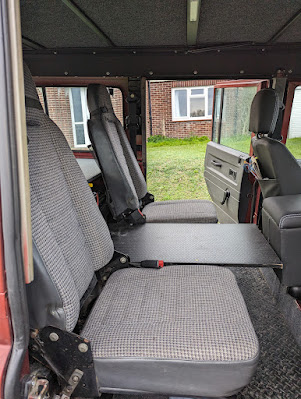
It has taken a lot of planning, but we've come up with a solution that allows us to retain the middle (second) row of seats for the boys while travelling and then convert the rear area into two beds for sleeping.  While the boys sleep downstairs, Sarah and I get the big bed up in the roof, in our Alu-Cab Icarus roof conversion.

Planning a 4-Berth Defender Interior Layout

There is lots of information online about camper layouts if you've got the standard Transporter, Sprinter, Crafter or Transit Van, but not much about Defenders.  If you want a family friendly, 4-berth Defender layout that retains four travelling seats, there's even less!  

The standard Defender Camper layout usually involves fixed cabinetry along one side, and some form of pull out bed on the other.  While the boys are still pretty small this might have worked, but we couldn't see them wanting to share a narrow bed for long!  The standard layout usually also involves removing the second row of seats, but this wasn't an option for us.

We did get some layout inspiration from our friends at whereistheworld, and from YouTube videos by Off-Track Family.  

After many hours sitting in the back of the Landy, measuring, sketching, and even a bit of 3D modelling in SketchUp, we eventually came up with our own solution, and I must say we're really pleased with it!

Defender Camper Interior Layout

Our Goals for the Interior

1. Retain at least four travelling seats (with seatbelts)

2. Maximise storage space

3. Full width sleeping area for the boys

4. Space for a cooler

5. Re-use as much of our existing camping gear as possible

6. Quick setup and stow

The Interior Build and Storage Solution

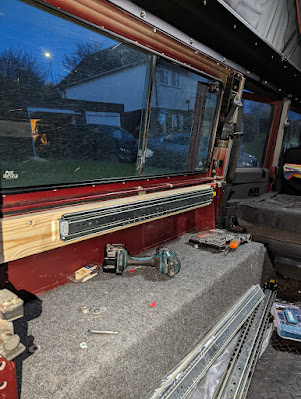
Our layout consists of a fixed platform in the back, which we built to fit under the lip at the top of the tub.  This is supported on two wooden beams which use the existing holes in the tub capping.  

Fitting a camper interior to a Land Rover Defender 110

Fitting a camper interior to a Defender 110

The platform is cut from 15mm lightweight eucalyptus plywood with a black phenol hexagon coating.  The platform is also supported by a vertical section of ply, which is slightly offset from centre for our sliding storage solution.

Land Rover Defender 110 Camper Interior Layout

We were really keen to make use of our existing RUX system, so used heavy duty drawer sliders from Aolisheng, and built a frame to support two 70 litre RUXs.  

RUX 70l in a Defender Camper

RUX storage solutions for Defender Camper

If you haven't come across RUX before, the 70l is a rugged, compressible, weatherproof, soft sided gear storage container with a wide rigid opening for easy access, a secure stowable lid and modular straps for easy carry.  Designed in Canada, and now also available in Europe, we use them all of the time!


We decided to remove the middle seat from the second row, and used the existing frame to build a platform for our Yeti cooler.  The Yeti Tundra 45 fits perfectly, and the Harvest Red is almost a match to Budgie's paintwork!

Land Rover Defender Campervan

Yeti Tundra 45 in a Defender Camper

In order to retain the boys seats, but still give them a full length bed; we used another two pairs of heavy duty drawer runners and built two sliding extensions, which pull out over the top of the folded middle row seats.  It only takes a couple of seconds to fold the seats forward and slide out the extensions.


We then had some custom foam cut to size.  The foam for the extensions is 1.5" thicker than the foam on the fixed platform, which gives a nice flat surface for the boys to sleep on.


With Sarah and I sleeping up in the Icarus roof, we've comfortably got space for all four of us to sleep, and we're happy that we achieved the goals of our interior layout.

Read more about the rest of Budgie's camper conversion.

* Some of the links on this post are affiliate links.  It won't cost you any more, but we may receive a small payment if you purchase through our links.  We will never recommend a product which we haven't fully tested and love. 

Monday 25 March 2024

Fitting a Diesel Heater to our Defender Camper

Following on from our post about fitting solar panels to the Alu-Cab Icarus roof on our Defender, the next step was to install the auxiliary battery, run the internal wiring, fit the charge controller and fit the diesel heater!

Diesel Heater Location

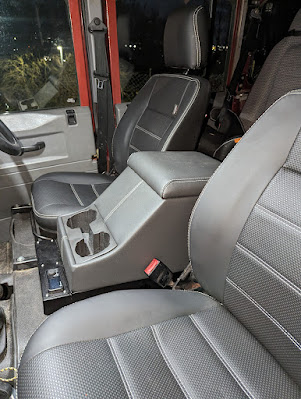
After much debating on the position for the diesel heater in the Defender, we decided that the best solution for us was to remove the front middle seat and fit the heater in the Nakatanenga heater console. 

Diesel heater console and cubby box in a Land Rover Defender

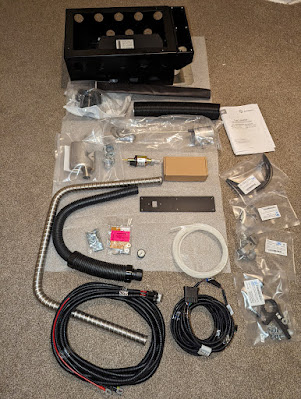
Nakatanenga supply a full heater kit for the Defender, with all of the components required to fit it.  The only UK supplier is 4x4overlander, the website is not always up to date with stock, so do give them a call or email to confirm availability.

Nakatanenga Diesel Heater Kit for Land Rover Defender

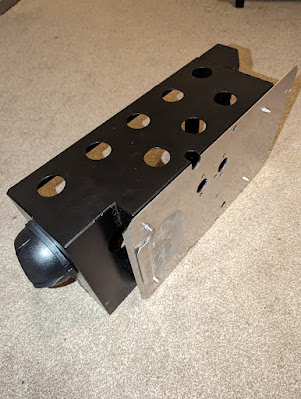
Mounting the Diesel Heater in the Console

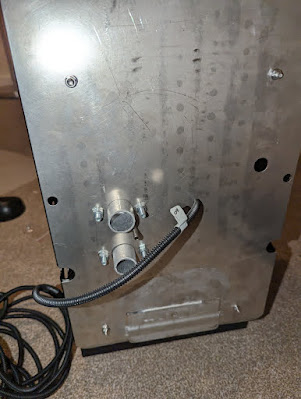
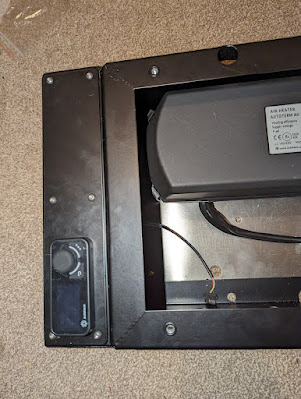
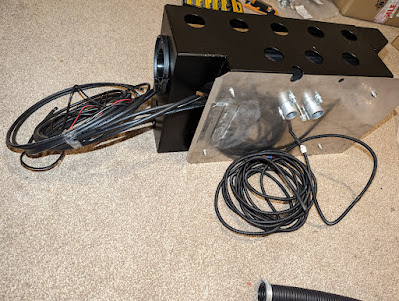
I started by fitting the heater console to the mounting plate, and then fitted the heater inside the console.  The power supply to the fuel pump can be fed through the small hole in the mounting plate.

Defender Diesel Heater console

Defender Diesel Heater Console

Diesel Heater fitted to the mounting plate

The console comes with a few options for the mounting plate for the controller, we decided to just keep it simple at this stage and got the option with a single hole for the controller.  The controller has a backing plate which is bolted through the plate, and then the controller simply clicks onto the backing plate.

Nakatanenga Diesel Heater Controller

Solar Charge Controller

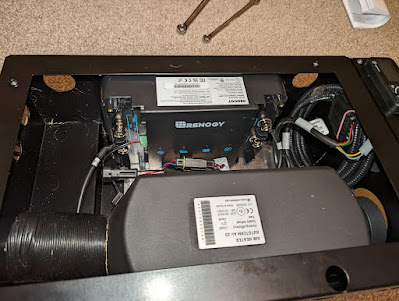
We decided to make use of the additional space in the heater console to mount the Renogy solar charge controller.  We went with a 30A DC-DC Battery Charger with in-built MPPT.  
(Use this link for a 7% Renogy discount code on your purchase.)

The charge controller fits nicely inside the heater console, with plenty of space for the required wiring.

DC-DC Battery Charger in a Nakatanenga Heater Console

I wired up all of the cables to the charge controller at this stage, and left the cables long so that they could be run to their final positions in the battery compartment.

Nakatanenga Heater Console with Solar Wiring

In hindsight I should have also fitted the air intake, exhaust pipe and fuel line at this stage too, as they are really fiddly to fit from underneath once the heater is in position.

Installing the heater assembly

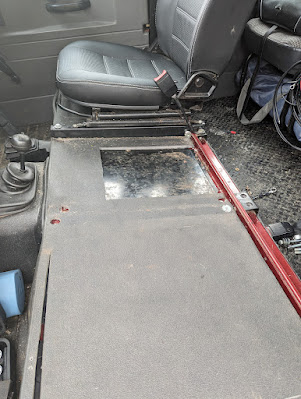
The first step was to remove the centre seat, I also removed the passenger seat to make access easier.

Defender front seats

Defender seat box

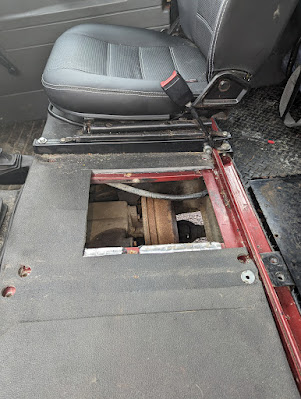
Budgie's previous owner fitted these great sound deadening rubber mats, so the next step was to carefully cut out the matting to the dimensions of the heater console.

Land Rover Defender seat box rubber mats

With the mat cut out, the access plate can be removed (just a couple of screws holding it in place).  The access plate is exactly the same dimensions as the mounting plate supplied with the diesel heater kit.

Defender middle seat access plate removed

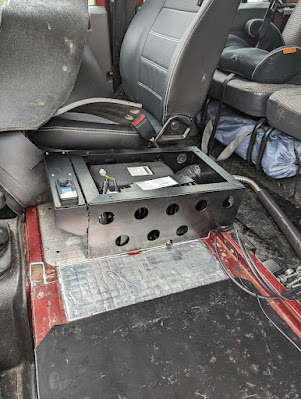
The whole assembly can then be fitted in place of the access plate.  The mounting plate has a recess at the back which catches the frame of the seat box, and uses the same screw positions at the front to secure it in place.

Defender diesel heater console in position

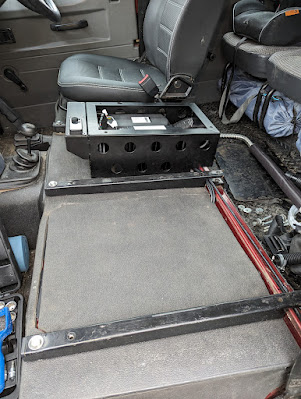
The rubber mats are then refitted, and the seat rails replaced.  All of those long cables from the solar charge controller, which we fitted earlier, are run along the back of the seat box and into the battery compartment. 

The positive cable from the solar panel is also fed along this route and into the charge controller, while the negative cable from the panel is fed into the battery compartment.

Land Rover Defender diesel heater centre console

Battery Compartment and Solar Wiring

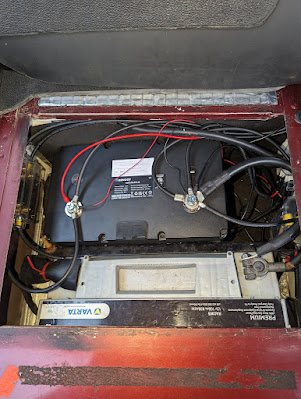
With a bit of shuffling about, I managed to get the original start battery moved over slightly which made enough room for the new 100Ah Renogy lithium (LiFePO4) auxiliary battery.

Renogy lithium auxiliary battery in Defender seat box

There's also enough room for the ANL fuses required for the solar wiring and a new Blue Sea auxiliary fuse panel, which all of the auxiliary loads will be wired to.  At the moment the only auxiliary load is the power to the lighting in the Alu-Cab roof, but the plan is to add some more charging points in the back later, and maybe some heated seats!

The two ANL fuses are mounted to the front of the seat box, and the auxiliary fuse panel is mounted to the back of the seat box.

Solar ANL fuse in Defender seat box

Blue Sea auxiliary fuse box in Defender seat box

The diesel heater comes with a fused power supply, so this was wired straight to the auxiliary battery, and the fuse holder mounted beside the new auxiliary fuse panel.  With everything in position the solar cables can be cut to length, terminated with a crimping tool and wired up to the correct positions.

Auxiliary Battery wiring for a solar powered Defender

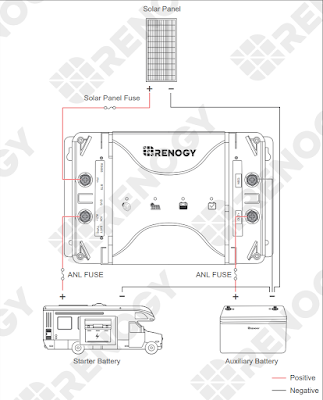
The charge controller comes with clear instructions and a handy simplified wiring diagram.

Renogy solar charge controller wiring diagram

Air Intake, Exhaust and Fuel Line

With everything sorted inside the Land Rover, it was time to fit the external components.  Thankfully it's easy enough to crawl under a Defender, so no need for ramps etc.

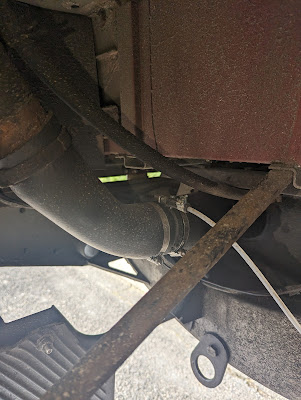
As I said earlier, it would have been easier to fit the air intake, exhaust and fuel lines before fitting the heater assembly into the vehicle, but it is possible to fit them from underneath.  All three lines are pretty close together, so it's just a bit fiddly getting the lines into position and tightening up the fasteners.  It would probably be best to do the fuel line first, as this was really awkward!

Air intake, exhaust and fuel lines for the Defender diesel heater

I ran the fuel line and the fuel pump power supply cable along the chassis rail, following the route of the existing vehicle electrics.  You can then cut the fuel line to length and fit the fuel pump.  The pump is fitted in a rubber mount which I screwed to the chassis leg behind the rear wheel.
 
Diesel heater fuel pump

Fuel pump in position on the Defender chassis

The heater kit is supplied with a fuel pick up, which fits into the Defender fuel filling trunk.  I popped the filling line off, cut the pipe at the required position, fixed the fuel pick up into position, then re-fitted the whole assembly.  Don't do this with a full tank, while parked on a slope, or you will spill diesel everywhere - trust me!

Diesel heater fuel pick up


Bending the fuel pick up pipe down a bit, lets you decide whether the pick-up reaches all the way to the bottom of the tank, or leave a bit of reserve in the tank, so that the heater can't run the tank empty.

For the heater exhaust pipe, I followed the vehicle exhaust pipe.  Cut the pipe to length, and fitted the provided silencer, screwing it to the chassis cross member.


The air intake pipe also runs towards the back of the vehicle, but closer to the middle and above the chassis cross member, so that there is a bit of separation between intake and exhaust.

Powering up!

With everything connected, it was time to power up and test the heater out.  It took a couple of attempted starts, to get the fuel pumped all the way from the tank to the heater, but after that it fired up straight away, and ran for the required 2 hour running in period with no problems.  

Once everything was in and tested, we fitted the Exmoor Trim cubby box to the top of the heater console, and I think it looks great.  Next up is the rear storage and sleeping solution for the boys!

Diesel heater console and cubby box in a Land Rover Defender

Read more about the rest of Budgie's camper conversion.

Tuesday 20 February 2024

The Isle of Jura

One of our favourite things about living in Victoria, BC, was being able to explore beautiful Vancouver Island and the Gulf Islands, but our love of islands didn't start in Canada.  It actually started in Scotland on the Isle of Jura.

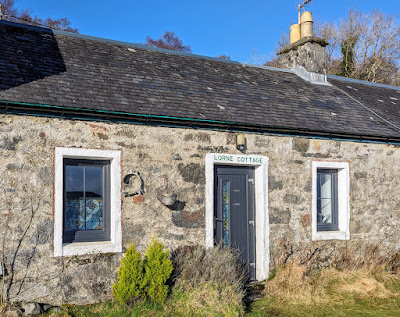
Lorne Cottage, Caigenhouses, Craighouse, Isle ofJura

I (R) have been visiting Jura for almost 40 years now, and Sarah has been joining me for more than 20 years.  It's one of our favourite places, and we even got married there on the beach at Corran Sands in 2012.  

Isle of Jura Wedding at Corran Sands

One of the best things about being back in the UK, is being able to get up to Jura regularly.  This is our third trip up in the last 6 months!

About the Isle of Jura

Jura is an island in the Inner Hebrides, off the west coast of Scotland.  


Despite being the 8th largest of the Scottish islands (about 30 miles long and 7 miles wide), it is only the 31st largest in terms of population with around 200 permanent residents.  The residents are vastly numbered by Red Deer, with a fairly steady population of around 5000, and in fact the name Jura is thought to derive from the Old Norse word Dyrøy meaning "deer island".

Red Deer on the Isle of Jura

The island is dominated by three large peaks, known as the Paps of Jura, which make for a distinctive silhouette from the mainland and also from neighbouring Islay.  Only the South and East coasts of the island are inhabited, leaving the West coast as a beautiful wilderness which is only accessible on foot or by boat.

With its small, friendly population and remote feeling, Jura is a magical place which really gets under your skin and many visitors return on a regular basis.

Getting to the Isle of Jura

The Isle of Jura was described as "ungettatable" by George Orwell when he was writing his famous novel '1984' on Jura.  Fortunately it's not that difficult these days, and there are a number of options to get here, but it does take a bit of planning!  The major options are listed below, but get in touch with us if you need help planning your journey.

Jura Passenger Ferry

This is our favourite way to get to Jura. The Jura Passenger Ferry crosses between Tayvallich, on the mainland, and Craighouse on Jura.  It's the quickest (less than an hour) and most scenic way to get across the Sound of Jura, but is for foot passengers only, no vehicles.  Craighouse is the main settlement on Jura, so it's an ideal place to land.

Car Ferry

Caledonian MacBrayne (CalMac) sail to Islay from Kennacraig, on the Scottish mainland, to either Port Ellen or Port Askaig on a regular basis.  This route takes about 2 hours, and you can check out the current schedules online at calmac.co.uk.  From Islay it's a short journey from Port Askaig to Feolin on the Jura Ferry, which takes around 10 minutes to cross the Sound of Islay.  You will likely need a car (or bike if you're feeling fit) for this route, although there is a limited bus service available on both Islay and Jura.  Be sure to check that the connections work if you are planning to come over as a foot passenger with CalMac, we've been stranded on Islay before!

Ferry traffic queuing for the Finlaggan at Kennacraig

By Air

There are regular scheduled flights between Glasgow (GLA) and Islay (ILY) airports with Logan Air

What to do on Jura

Jura is rightly famous for its whisky, visit the Jura Whisky website for details on tours and tastings.

Did you know that Jura is now also home to a gin distillery, rum distillery and brewery?  

Lussa Gin distill by hand in a traditional still in a converted stable on the Ardlussa Estate at the North end of the island.  Using 15 botanicals which they grow or forage on the island, it's the 'spirit of island adventure'.  They are also open for tours, check out the Lussa Gin website for details.

Deer Island Distillers make a small batch Scottish spiced rum from the business units at Craighouse Pier.  They have a distillery shop and also offer tours, check out the Deer Island website for details.  They're also right next door to Konrad's beautiful photography gallery - The Whisky Island, and the local craft store - Camella Crafts.

Jura Brewery are still finishing the construction of their new brewery at their croft in Kiels, which is about a 15 minute walk.  Their Laughing Stag is an easy drinking pale ale which you can find in the community owned Jura Stores, in the Jura Hotel bar, and from the Jura Brewery TrALEr at certain events.

Jura Brewery Laughing Stag

It's not all about alcohol though!  Throughout the year there are a number of regular events, which can see the Jura population expand significantly, you're strongly recommended to book early if you want to stay on Jura during these events:

Jura Fell Race - this 28km fell race sees 200 competitors climb seven of Jura's summits on the last weekend in May.  This is one of Jura's busiest weekends.
Ardlussa Sports - this annual sports event is great fun for all of the family and raises money for local charities, it usually happens the last weekend in July. Events include tug of war, hammer throwing, barrel rolling and family races.
Jura Regatta - this day of water based sports is usually held on the first Saturday in August.  Events include open water swimming, rowing, kayaking, sailing and a raft race.
Jura Music Festival - this great festival is usually held on the last weekend in September.  

Jura has some amazing scenery and wildlife which you can explore for yourself, or take a guided tour with one of the locals:

Jura Guided - Grant offers guided walks suitable for all levels around the island.
Jura Boat Tours - Robert offers small group wildlife and sightseeing tours in their MCA approved RIB. 
Discover Jura - Alex offers small group tours by minibus and in conjunction with Jura Boat Tours.
Jura Cycles - Are now offering bike hire on Jura to help you get around.

Where to stay on Jura

Jura has a variety of options for places to stay, from a super luxury hotel to rustic bothies, and everything in between.  

Lorne Cottage

Of course we are biased, but we think Lorne Cottage is one of the nicest small holiday cottages on the island.  Sleeping a maximum of six, but more comfortable for four, our wee cottage in Craighouse was fully rebuilt in 2019.  With stunning views over Small Isles Bay, our self catering holiday cottage is literally a stone's throw from the beach and just a short stroll into the village.

Lorne Cottage, Isle of Jura


While we were in Canada, we offered the cottage up for long term let and had a number of great tenants.  Now that we are back in the UK, and will be able to visit more often, we're moving to a holiday let arrangement. Stay tuned for an announcement when we are ready to start taking bookings.

Self Catering Holiday Cottages and Bed and Breakfast

There are a number of other holiday cottages available to rent on Jura, and a couple of options for Bed and Breakfast. The most comprehensive listing can be found on the Jura Development Trust's website.

Jura Hotels

Until fairly recently there was only one hotel on Jura, the imaginatively named Jura Hotel!  The Jura Hotel also has a public bar, which serves as the island's only pub.  

When an Australian hedge fund manager bought the Ardfin Estate, he set about a massive investment program; including building a world class 18-hole Golf Course, a huge extension of Jura House and refurbishment of agricultural buildings into a boutique hotel.  If you have deep pockets, Jura House can now be rented for up to 20 guests on an exclusive basis (minimum 3 nights, price on application), or you can stay in the Quads on a hotel basis for a rumoured £1000 per night!

Camping

The Jura Hotel has a large waterfront field which acts as a semi-formal campsite during the summer.  There is a shower block, toilets and laundry facilities available to the side of the hotel, via a key fob system.  Enquire at the hotel for the latest prices and seasonal opening.

Wild camping is permitted on Jura, but it should be noted that this does not extend to vehicular camping.  Please follow the Scottish Outdoor Access Code and Leave No Trace:

    This type of camping is lightweight, done in small numbers and only for two or three nights in any one         place. You can camp in this way wherever access rights apply but help avoid causing problem for local     people and land managers by not camping in enclosed fields of crops or farm animals and keeping well     away from buildings, roads or historic structures. If you wish to camp close to a house or building, seek     the owner’s permission. Leave no trace by taking away all your litter. Remove all traces of your tent            pitch and of any open fire.

There are extremely limited places to park campervans, all without facilities, but there are public toilets by the big pier in Craighouse.  Large motorhomes are unsuited to Jura's single track road, and may struggle to get on and off the wee ferry!

Isle of Jura Tourist Map


Is Jura in your plans for this year?  If not it probably should be!

Monday 22 January 2024

Fitting Solar Panels to our Defender Camper

The second phase of Budgie's camper conversion involved fitting a solar power system.  After much research around split charge relays, battery to battery (B2B) chargers and battery composition, we ended up with a 175 Amp solar panel charging a lithium battery via a B2B charger.  

Having used Renogy equipment on our RV camping trailer in Canada, they were an easy choice for the Land Rover Defender.  (Use this link for a 7% Renogy discount code on your purchase.)

Mounting the Solar Panel


The first step was to mount the 175A solar panel to the roof.  The Alu-Cab Icarus roof conversion comes with a track system and we paid a bit extra for a set of Alu-Cab load bars.  The load bars are fitted with a t-track on the top and one side to allow simple fitting of accessories.  It seemed to make sense to fit the solar panel between two of the load bars, but we wanted the bars to still be available to use for other equipment (like skis).  

Land Rover Defender Alu-Cab Icarus Roof Bars

I'd seen a few people mount the panel flush with the bars, but I was worried about the panel getting damaged while loading, so decided to mount it below the bars.  A few aluminium angle brackets and some t-slot nuts, made it quick and easy to fasten the panel to the bars. 

Solar Panel Mounting Hardware for Alu-Cab Load Bars

The plastic end cap on the bars simply knocks off, allowing the t-slot nuts to be slid along the side-facing track.  Using M6 pan head bolts, each bracket can be fastened loosely to the track.

Alu-Cab load bar solar panel bracket

With two brackets fitted to the load bar, the panel can be offered up and the brackets slid into position to align with the pre-drilled mounting holes on the panel.  I used M6 flanged bolts and nyloc nuts to fasten the panel to the brackets.

Renogy loar panel mounted to Alu-Cab load bar

Repeat for the other load bar.

Renogy solar panel mounted to Alu-Cab load bars

Once the panel is fitted to the bars, the whole assembly can be slid onto the cargo track on the Icarus roof from the back.  Once in the final position tighten up all of the fasteners.

Solar Panel mounted to Land Rover Defender Alu-Cab Icarus roof

Running the solar cables

After removing the cab parcel shelf and the front passenger corner of the side panelling, I was ready to drill through the roof.

Drilling a pair of 18mm holes through the side of my new roof was terrifying.  Measure twice (or three times) drill once!
Alu-Cab Icarus solar panel wiring

I used a pair of 20mm cable glands to get the cables through the roof and into the cab.

Alu-Cab Icarus roof with solar panel cable glands

I also fitted a cable entry housing over the top of the cable glands, just to be doubly sure that the holes were watertight.  The housing was sealed and stuck in place with sika-flex, and held in place with a ratchet strap over the roof while it cured.

Cable entry housing being fixed to alu-cab icarus roof

I decided to run the solar cables along the outside of the roof following the gutter line, which means they are mostly hidden behind the awning when the roof is closed.  Remember to leave enough length for the roof to open!
Alu-Cab Icarus Land Rover Defender Solar Panel Cables

I used a pair of 1.5m (5ft) solar cable extensions between the panel and the front of the roof, and then a 3m (10ft) solar adaptor kit from the front of the roof to the battery compartment.

Once inside the cabin, the cables can be run along the inside of the Icarus roof to the B-pillar behind the passenger door.  Routing down the B-pillar, takes the cables to the battery compartment under the passenger seat.

Read on for info about the internal wiring and fitting the diesel heater.

Read more about the rest of Budgie's camper conversion.